FAQ
General
-
Not at all! While RUOnlineCon is hosted by Rutgers University, the conference welcomes everyone with an interest in online education, instructional design, digital pedagogy, or the intersection of teaching and technology.
-
RUOnlineCon is a fully virtual event hosted on an easy-to-use online platform. You can attend sessions, network, and access materials from anywhere with an internet connection.
-
RUOnlineCon is free for all current Rutgers faculty, staff, and students. Please select the appropriate ticket type on the registration site. NOTE: All attendees must pre-register for the event regardless of fees.
For attendees outside of Rutgers, individual registration is $29. You may select the appropriate ticket type on the registration site and pay via credit card.
If you wish to pay via Purchase Order, please email ruonlinecon@uoes.rutgers.edu and an invoice with additional registration and payment instructions will be provided.
-
Yes! You may select one of the following ticket types on the registration site:
- A Group Pass is available for $149 and covers up to 49 individuals — a great option for teams of 6 or more.
- An Institution Pass is available for $299 and covers 50 or more registrants with no upper limit.
Once your online payment is received, you will receive an email with instructions and a special code to share with your group members. Each individual will be required to complete their own registration on the event site.
If you wish to pay via Purchase Order, please email ruonlinecon@uoes.rutgers.edu and an invoice with additional registration and payment instructions will be provided.
-
The full program and session schedule will be released no later than the first week of February. Registered participants will receive an email notification once it’s live.
-
Registration is open up to the start of the event and through the entire day; however, early registration is encouraged to ensure access to pre-conference communications and platform setup details.
-
Yes! All sessions are recorded and uploaded to the conference platform within one week after the event.
Registered attendees will have 12 months of access to the recordings through the platform’s “Replay” section.After one year, select session videos are added to our RUOnlineCon YouTube Channel, where you can find recordings dating back to 2018.
-
We can verify your attendance upon request, but it’s up to your employer or accrediting body to determine whether the conference qualifies for CE credit. If you’re attending for CE purposes, please confirm with your employer beforehand.
-
Absolutely! RUOnlineCon includes interactive sessions, live chats, and virtual meetups where you can connect with colleagues, presenters, and instructional technology professionals from across the country.
-
Please email us at ruonlinecon@uoes.rutgers.edu and we’ll be happy to help.
Attendee
-
To register for an event:
- Click Register on the RUOnlineCon webpage to navigate to the registration landing page to get started!
In the Registration widget, select a ticket and click Continue. If applicable, you can sign in to your existing RingCentral Events user account to have your data populated. (Group/Institution Pass Note: One individual should register using the group option. You will receive an email with instructions and a special code to share with your group members. Each individual will be required to complete their own registration on the event site.)

Next, enter your registration information (email, name, and any additional custom questions). Once ready, click Continue. (Important: Ensure you enter the correct email address.)

Next, you may be prompted to enter your card information. If you wish to pay via Purchase Order, please email ruonlinecon@uoes.rutgers.edu and an invoice with additional registration and payment instructions will be provided. Once ready, click Register.
(Note: Your name and email will automatically populate the cardholder details. While you can update the name later in your Profile Dashboard, the email address cannot be changed—it must remain the attendee’s email to ensure proper event access. If the credit card holder is different, please still use the attendee’s email during registration.

Finally, review the registration confirmation and the email address to which the confirmation email is sent.

Head to your email inbox to find your registration confirmation email. It will include the event details and your personalized Magic Link to enter the event.

-
Accessing an event via Magic Link:
Your registration confirmation email and most of the automated event emails contain your personalized Magic Link. The Magic Link acts as an "access pass" to the event. No two magic links are the same. Each is unique for every attendee at every event.
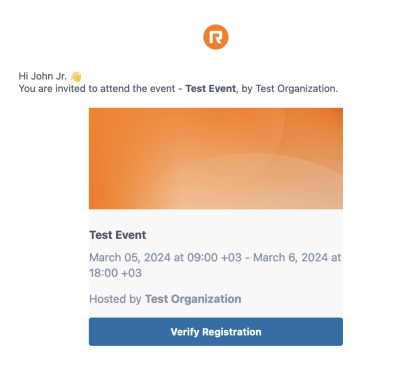
- If you have an existing RingCentral Events user account, you will receive an email prompting you to Login & Join Event. If you do not already have a user account, you will receive an email to Verify Registration to proceed. When accepting the invite, you will additionally receive the Order Confirmation email. All emails will contain your personalized Magic Link, allowing you to access the event.
If you don't have a user account, you will also be prompted to agree to the platform's terms and conditions first. Click Continue to have an account created for you and accept the invite. Alternatively, click Decline invitation and remove my data from RingCentral.

- Click on the Magic Link to be instantly directed to the event!
-
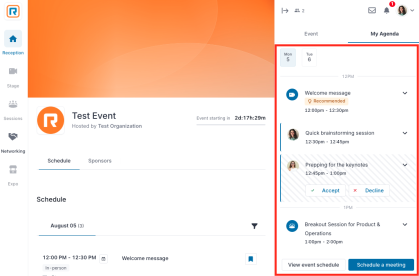
My Agenda allows you to create your personal schedule for a curated event experience. My Agenda is located in a dedicated tab in the activity panel. It includes:
- Schedule segments set as recommended by the Organizer.
- Scheduled segments you added to My Agenda manually.
- Scheduled 1:1 meetings you created or have been invited to.
Once your My Agenda item is about to start, you will get a notification both in the browser to ensure you don't miss it.
Adding schedule segments to My Agenda
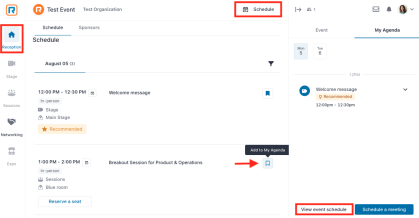
To add a schedule segment to My Agenda, click the Bookmark icon next to the segment in the schedule. In the same way, you can click the Bookmark icon next to the added segment to remove it from My Agenda.
There are multiple ways you can access the schedule:
- Go to the Reception area.
- Click View event schedule in the My Agenda tab.
- Click Schedule in the event header.
Scheduling 1:1 meetings
In My Agenda tab, you can invite other attendees to a meeting by clicking Schedule a meeting, as well as accept or decline the meeting invites you've received.

Alternatively, you can also open an attendee's profile and click Schedule a meeting.
In the Request a meeting window, fill in the following information:
- Meeting title
- Day
- Start time/end time: Manually enter the meeting start and end time.
- Mutually available times: Select one of the available time slots generated based on the My Agenda availability of all selected participants. Click More times to display more time slots.
- Select meeting guests: You may invite up to 19 attendees to your meeting.
- Meeting description
Once ready, click Send invitation.
Managing My Agenda items
To manage a 1:1 meeting:
- Click the Arrow icon to expand the item to:
- Add it to your calendar.
- Review the list of participants.
- Change your participation status (applies to the invitees only).
- Hover over the item and click the Menu icon
- Edit the meeting (applies to the creator only).
- Cancel the meeting (applies to the creator only).
- Or to remove the meeting (applies to the invitees only).
To manage a schedule segment:
- Click the Arrow icon to expand the item to add it to your calendar.
- Hover over the item and click the Menu icon to remove the item.
-
The Networking area is designed to promote connections between attendees. Here, you can complete your profile, search for people based on their jobs and interests, connect with others, and participate in Speed Networking.
Completing your profile
Completing your profile helps the platform tailor your recommended connections and content so you can get the most out of interacting with other attendees.
To complete your profile:
In the Networking area, click Complete your profile.

In the Your profile window, the yellow tags will notify you what information is lacking.

Click Personal info to upload your profile picture, change your name, add a headline, a short bio, an organization, and social media links. Once ready, scroll down and click Save.

Click Interests to select interests. The questions are multi-select and single-select. Once ready, click Save.

Using search function
Once you have completed your profile, it will be easier for others to find you when they search for specific interests! You can also do the same.
Use the Search bar to search for keywords or click Filters to filter the people list by specific interests. Everyone with the specified interests or keywords will be shown under Recommended connections.

Connecting with others
Under Recommended connections, attendees with similar interests will appear. To contact someone, click Send a Message to send a direct message. In the private chat, you can also review their profile information, start a 1:1 video call, or schedule a meeting for later.

Participating in Speed Networking
Speed Networking is a great way to meet people at the event. Under Speed Networking, click Join now to get randomly paired with someone else who has also clicked Join now in the 1:1 video chat.

Meeting length
Networking meetings have a configured minimum and maximum length. You will see the countdown timer indicating the amount of time left. When the time expires, the meeting ends. Once the minimum meeting duration has passed, you can leave the meeting by clicking Stop sharing Audio and Video.

Connecting
Click Connect to quickly and easily exchange contact information, similar to exchanging business cards at a physical event.
If you choose to connect, the other participant will get a notification suggesting that you exchange contacts.
If both of you choose to connect, you will see a small pop-up that the connection has been successful. You will see each other's contact details under Connections in the Networking area or in the Profile Dashboard.

Extending
The countdown timer will turn yellow as the meeting approaches its end. Click Extend to prolong the meeting.

The other participant will get a notification to confirm if they wish to extend the meeting.

-
The chat area is a great way of connecting and engaging with others.
Accessing the chat
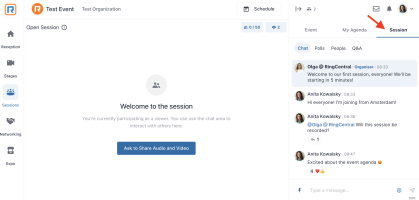
The chat is the default tab in the right-side activity panel. In a multi-track event, there are multiple activity panels and chats. When navigating around, pay attention to the activity panel tabs. The event-wide chat is located under the Event tab.
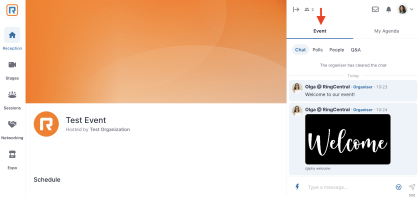
To access a segment chat (e.g. Stages, Sessions, Expo Booths), go to that specific segment. It will be located under a dedicated Stage/Session tab. You can still access the Event chat at any time, from any segment by switching to the Event tab.
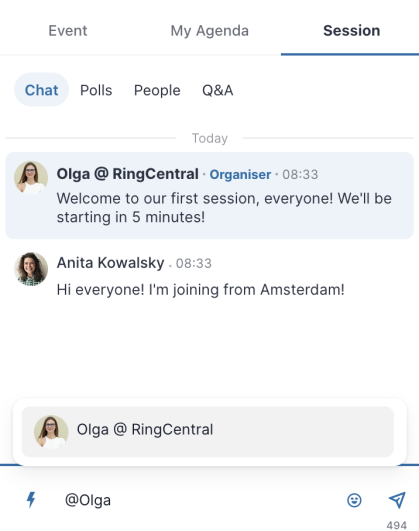
Mentioning an attendee
To mention or tag another attendee, type @ followed by their name. Once you start typing, the matching profile will get populated. Click on the profile (or press Enter).
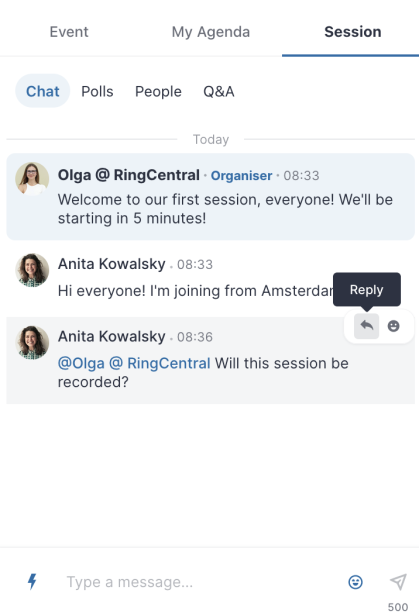
Replying in thread
Threaded messages make it easier to respond to specific messages and help to keep track of new responses.
To create a new thread:
- Hover over the message that you would like to respond to and click the Reply icon.
- Post your response.
Click the Arrow icon to return to the main chat.
Once a thread has been created, you can see how many messages are in the thread. Click this button to open the thread to review the messages and add your reply.

-
Participating in the chat
Upon entering the event, you'll notice the chat area in the activity panel on the right side. This interactive space allows you to engage with event organizers and attendees. You can utilize features such as tagging other participants, adding emojis, posting GIFs, reacting to messages, and replying in threads.

Searching people
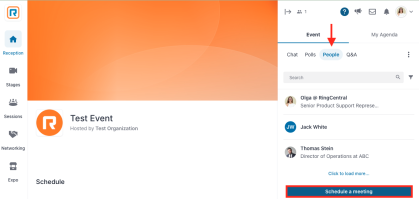
To explore the list of people registered for the event, go to the People tab in the right-side activity panel. Use the search field to find individuals by name, job role, etc. Additionally, you can filter the list by Organizers, Speakers, and your Connections made through Networking.
The Networking area is another space to discover who is registered. Utilize the search bar and apply filters based on specific interests set by the Event Organizer.
Exploring attendee profile
Clicking on the attendee in the chat, People tab, or Networking area opens their profile. Here, you can access additional information and contact details, including bio, website, and social media links. You may also:
- Send a direct message
- Invite to video call
- Schedule a meeting.
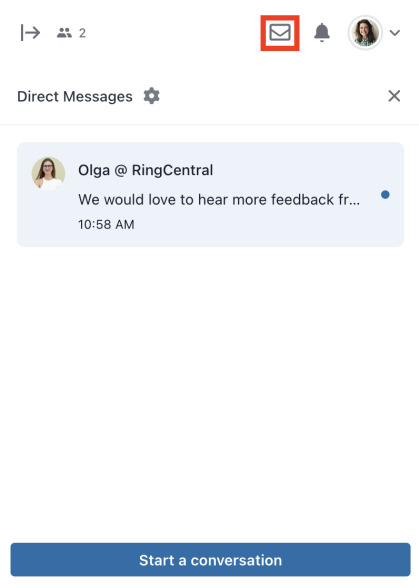
- Direct messages
To send a direct message to an attendee, open their profile and click Send message. This action opens a private chat on the right-side activity panel, functioning similarly to the public chat. Additionally, you can Invite to video call and Schedule a meeting.
Upon receiving a direct message, a pop-up notification will alert you. The direct messaging icon on the activity panel will also be marked red, indicating new messages. Click on the pop-up or the icon to access the chat. To review and access your ongoing conversations, click the Direct Messages icon.
Instant video calls
To initiate an instant video call, click Invite to video call while exploring the attendee profile or engaging in private chat. This action generates an automatic message containing a link to a private session room. Both users must click the link to join the room, which functions similarly to a public session room.
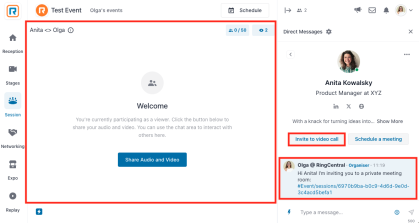
Upon receiving an invitation to a private meeting, you'll be notified through a pop-up message. The direct messaging icon on the activity panel will also turn red. Click on the pop-up or the icon to access the chat and view the message.
Scheduling 1:1 meetings
Another option is to schedule a private meeting for a later time. This allows you to schedule a group call and invite up to 19 participants.
To schedule a 1:1 meeting:
- In the activity panel, go to the People tab and click Schedule a meeting or Open an attendee's profile and click Schedule a meeting.
- In the Request a meeting window, fill in the required information.
- Once ready, click Send invitation.
Rescheduling a meeting
As a meeting creator, you can reschedule a meeting to a different time, add more participants, or adjust any other details.
- Go to the My Agenda tab.
- Hover over the selected meeting item and click the Menu icon.
- Select Edit this meeting.
- Change the meeting details and click Send invitation.
Accepting a meeting invite
When a meeting is scheduled, the recipients get a notification in the event venue where they can Accept or Decline the invite. They will also receive an email where they can Accept or Decline the invite, as well as, add it to their calendar.
Once the recipients respond to the meeting invite, you will receive a notification.
- If accepted, you will be able to enter the meeting room at any time.
- If declined, you will receive a similar notification.
Speed Networking
Speed Networking is a fun and dynamic way to meet other attendees. In this feature, you're randomly matched with different people for a set duration. During these interactions, you can extend the call and even share contact details.
The Networking feature can be found on the left hand Menu bar.
-
As an attendee, you can join an event hosted on RingCentral Events using a mobile browser, but there are limitations. For the best experience, we recommend using a desktop device (laptop or computer) whenever possible to enjoy the full range of RingCentral Events features.
Mobile browsers supported
We recommend using Google Chrome for Android, and Safari for iOS.
Mobile browser limitations include:
- Screen sharing: You cannot screen share when joining a screen in the app.
- YouTube integration: YouTube videos shared in a Session room via direct integration will not be visible.
- Sharing microphone: iOS users may get muted when joining a screen without the possibility to unmute.
-
In preparation for the event, we recommend taking the time to allow Ring Central (The virtual event platform) to have access to your camera and microphone in your Chrome browser.
When joining a Networking session, 1:1 video conference with another attendee, or being invited to participate in a Session, Chrome will ask for permission to use your microphone and camera. If it does not, or you accidentally disable permissions, we have provided directions below to fix your issue:
- At the top right, click More Settings.
- Click Privacy and Security >> Site settings >> Camera or Microphone.
- Select the option you want as your default setting.
- Review your blocked and allowed sites.
- To remove an existing exception or permission, click Delete to the right of the site.
- To allow a site that you already blocked, under Not Allowed, select the site's name and change the camera or microphone permission to Allow.
For further information and troubleshooting please visit HERE.
If You Are Still Having Issues
If you have followed the directions above and are still encountering issues, we recommend the following actions:
- Please ensure that your version of Chrome is up to date with the newest version. For details on how to do this, please click HERE.
- It has been found that issues can arise from data stored in your browser’s cache and cookies. After you clear your cache, please close out all instances of Chrome that are active on your computer and then re-open Chrome. For more information on how to complete this process, click HERE.
-
Portions of this conference will be live-streamed, and all sessions (virtual and in-person) will be video/audio taped. By registering, your attendance at, or participation in, this conference constitutes your consent to the use and distribution by Rutgers of the attendee’s image or voice for informational, live-stream, publicity, promotional, and/or reporting purposes in print or electronic communications media.
Video recording by participants and other attendees during any portion of the conference is not allowed without special prior written permission from Rutgers. Photographs of copyrighted PowerPoint or other slides are for personal use only and are not to be reproduced or distributed. Do not photograph any such images that are labeled as confidential and/or proprietary.
-
All session formats (Interactive Workshops, Panel Discussions, and Presentations) are 50 minutes in length, including the question-and-answer period.
Presenter
-
- Check your browser: For the best experience, use the latest versions of Google Chrome, Mozilla Firefox, or Microsoft Edge (for Windows 10 and up) on your laptop or desktop computer. For RingCentral Events Studio, use Google Chrome or Microsoft Edge.
- Check internet connection: Run a speed test (e.g., https://www.speedtest.net/) to make sure you have 30Mbps+ for both download and upload speeds for the best experience and highest resolutions across the event.
- Check internet settings: Ensure VPNs, proxies, or firewalls are disabled.
- Complete our pre-event test: Test your local device setup with our test. For detailed steps, refer to our guide on RingCentral Events Pre-Event Check.
- Conduct a test run: Registered Speakers can access the online event venue before the start time.
- Use the same device/network: Use the same device and network to conduct rehearsal & pre-event checks and join the live event.
- Test your audio and video: Use headphones to eliminate echo and background noise, and put the camera at eye level. Consider using a virtual background and other video settings.
- Reduce CPU load: RingCentral Events is a CPU-intensive platform. Close unnecessary apps and windows.
- Broadcast delay: Be aware of a possible up to 30-second delay when broadcasting to a Stage.
- Check out general troubleshooting tips for audio and video issues.
-
The RingCentral Events Pre-Event Check tool will test your browser compatibility, audio and video setup, speaker setup, connectivity and internet speed.
Visit the tool here - Pre-Event Check
-
RingCentral Events Studio is a built-in streaming production tool that can be utilized in both a Stage and a Session.
The Stage area can be compared to the stage of a real conference. The Stage allows you to reach the entire audience in one place. It’s great for — keynotes, presentations, fireside chats, panels, interviews, etc.
Sessions function more like breakout rooms or workshops. Attendees can request to join the screen to ask questions via video or participate in a round table discussion, making the experience highly interactive. Session types include:
- Open: Anyone can participate on screen.
- Moderated: Organizers and assigned Moderators approve or reject requests from Attendees and Speakers to appear on screen.
Invite only: Specified people can participate on screen.

-
To start, you may access an event as an attendee by signing in to your RingCentral Events account or by clicking on your personalized Magic Link in the registration confirmation email. For detailed steps, refer to our Attendee FAQ above.
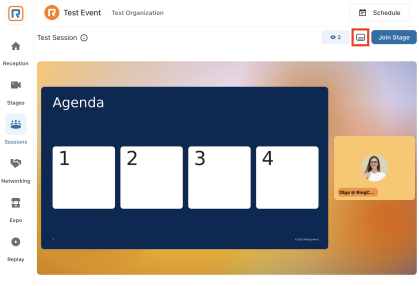
Stage Access: You cannot enter the Stage directly from the live event. To broadcast, you must access the studio via the dedicated Backstage link. If you do not have the Backstage link, please get in touch with the event organizers at - ruonlinecon@uoes.rutgers.edu. Once you enter the backstage area, you can use the private chat to communicate with other Speakers, but only Organizers and Moderators will see you. An Organizer or a Moderator will bring you to the screen when it’s time for your presentation.
Session Access: You can access your Session by going to the Sessions area on the left side panel. Scheduled segments typically appear five minutes before their start time. The Session will be marked as a Test Run until the official scheduled start. You may alternatively ask a Moderator for a direct link. Click Join Stage. If the Session is moderated, you may need to wait for a Moderator or an Organizer to approve your request. Once you see yourself on screen, you're live to your audience.
-
If your proposal has been selected, you will personally receive additional guidance that includes resources for your specific type of presentation. You should also consider these best practices:
- Test Your Tech Beforehand
- Prepare Clear Slides
- Set Expectations
- Manage your Time Wisely
- Practice Transitions Between Content and Interaction
- Engage with Audience Ideas
- Promote Conversation
-
Powerpoint for Mac users
First, check your Mac settings to confirm your browser has permission for screen recording:
- Open System Settings.
- Navigate to Privacy & Security > Screen Recording / Screen & System Audio Recording.
- Toggle on permissions for your browser.

Next, prepare your PowerPoint:
- Open your PowerPoint presentation.
- Under Slide Show, click Set Up Slide Show.
In the Set Up Show window, select Browsed by an individual (window) and click OK.
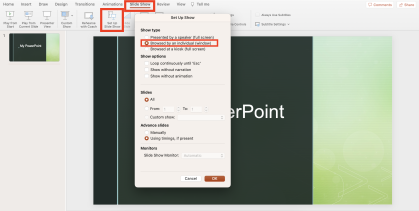
Click Play from Start to start your presentation.
Finally, share your PowerPoint in a Session:
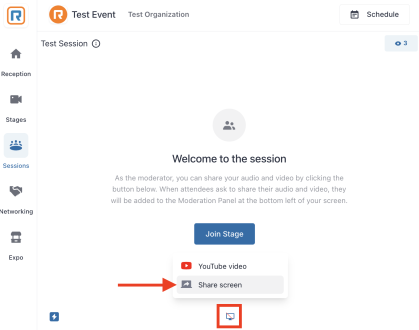
- Click Join Stage to join the screen.
Open the Share menu and click Share screen.

- In the pop-up window, under Window, select your PowerPoint. Click Share to start sharing.
Note: Organizers and Moderators can share content without joining the screen. The Share menu option stays accessible at all times.
If you don't see your PowerPoint listed here, it may be due to full-screen mode limitations on Mac. Ensure that your PowerPoint window is not in full-screen mode, visible in the background and not minimized to tray.
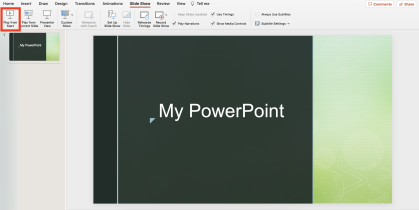
Powerpoint for Windows users
To prepare your PowerPoint, click Reading View at the bottom left corner of your PowerPoint. It will switch your presentation to a movable box.

To share your PowerPoint in a Session:
- Click Join Stage to join the screen.
Open the Share menu and click Share screen.
- In the pop-up window, under Window, select your PowerPoint. Click Share to start sharing.
Note: Organizers and Moderators can share content without joining the screen. The Share menu option stays accessible at all times.
Tip: On Windows, you can share system audio by sharing your entire screen in Chrome. This allows you to present with PowerPoint sound. If using this option, consider having a second screen with the RingCentral Events tab open.
-
In order to share your screen within the Ring Central Events platform, please ensure that your Mac has proper permissions allowing for Chrome to record your screen. To complete this process, please review the following steps:
- When first attempting to share your screen, Mac OS will open a dialogue box advising you that “Google Chrome” would like to record this computer’s screen. Please click Open System Preferences. If you do not see the dialog box, please open System Preference >> Security and Privacy >> Screen Recording.
- In the Screen Recording section, click the box next to Google Chrome to allow screen sharing. Please be advised that you may need to unlock your system to make this change. Please do so from the button in the bottom-left.
- Next, click Quit Now in the dialog box. You will not be able to screen share until you quit and restart Chrome.
- Rejoin the event. You should now be able to share your screen!
Accessibility
-
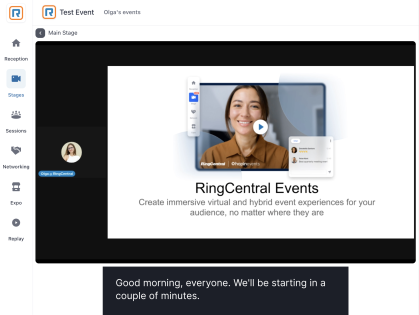
As an attendee, you can toggle Closed Captions on and off at any time with a simple click of a button within multiple areas of the event platform.
To enable Closed Captions in a Session, for example, click the CC button at the bottom of the screen. To turn closed captions off again, click the CC button once more and the video displays will return to full view.

Once you have clicked the icon, the video displays will become smaller, and you will see the captions being generated underneath. The captions will show who is speaking so that it is easy to follow the conversation.
If a Session room is powered by Studio, you will need to click the Captions button at the top of the screen or press C.
If your captions appear to be out of sync, or are showing incorrect words, it could be for a number of reasons:
- Your internet connection is unstable;
- A different language is being spoken; or,
- AI-generated captions are not always completely accurate so there may always be some errors.
NOTE:
- Closed Captions feature is not available in Firefox or Safari.
- Captions will only work in English (American, British, and Canadian).
- If a Session room is powered by Studio, closed captions will only work for speakers and are not supported for shared content that includes sound.
- Closed captions are not available for content that is being RTMP streamed into a Session room.
- Closed captions are not available for simulive segments linked to a Session room.
ALTERNATIVELY: When using Chrome (preferred browser), you have the option of using Live Captioning from within your browser which would be in play across the platform regardless of what segment you are participating in (e.g., Stage, Session, Networking, etc).
Instructions to enable Chrome Live Captioning can be found here.
-
We strongly recommend using the Chrome browser on a desktop or laptop computer. Please ensure that your version of Chrome is up to date with the newest version. For details on how to do this, please view the Google Chrome software update documentation.
It has been found that issues can arise from data stored in your browser’s cache and cookies. After clearing your cache, please close all active instances of Chrome on your computer and then reopen Chrome. For details on how to do this, please view Google's documentation.
-
Sessions will be recorded and made available within the Replay section of the platform after the session has been completed.
Head to the Replay area and find the recording that you would like to watch, and click the CC button at the bottom of the screen. This will open a small panel where you can select:
- Captions settings
- Captions off
- English
Click on Captions Settings to change the appearance of the captions. Here, you can change the text color, text size, background color, and even the font. Just make your selection from the respective drop down lists.
Click Done when you are finished to close the panel and return to the video.
Once you have turned the captions on and configured your settings, you will see the captions displayed over the video feed. To turn closed captions off again, click the CC button once more and the video displays will return to full view.
If your captions appear to be out of sync, or are showing incorrect words, it could be for a number of reasons:
• Your internet connection is unstable;
• A different language is being spoken; or,
• AI-generated captions are not always completely accurate so there may always be some errors.For more information, please visit Using Closed Captions in Replay.
NOTE:
- Closed Captions feature is not available in Firefox or Safari.
- Captions will only work in English (American, British, and Canadian).
- If a Session room is powered by Studio, closed captions will only work for speakers and are not supported for shared content that includes sound.
- Closed captions are not available for content that is being RTMP streamed into a Session room.
- Closed captions are not available for simulive segments linked to a Session room.
-
Ring Central uses Voluntary Product Accessibility Templates (VPATs) to evaluate their products against WCAG 2.0 AA and GSA 508. Ring Central will provide VPATs upon request. Please email accessibility@ringentral.com to request a copy for a RingCentral product.
Learn more about the Ring Central Platform and Accessibility here - Ring Central Accessibility.
-
Here you can review the current Ring Central Accessibility Statement.
-
Reach out to a Ring Central Accessibility team member at accessibility@ringcentral.com or fill out the form.
For any additional information or questions, please contact the RUOnlineCon planning committee: ruonlinecon@uoes.rutgers.edu